
AAFW 23: Wella X Anna Quan
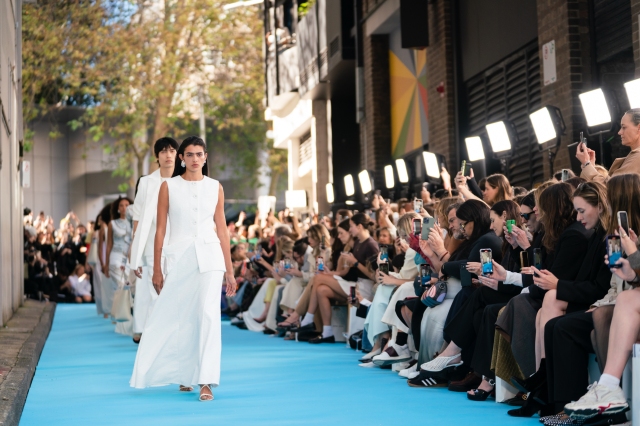
Backstage queen Renya Xydis was on hand once again to style looks at Afterpay Australian Fashion Week as Wella partnered with Anna Quan for a collection titled THREE. The fashion house celebrated everyday elegance that is effortless and achievable for the working woman, with a “gritty pretty” hair look that finished the aesthetic.


“Hair is really pretty and we have gritted it up with the product around the hairline,” Renya shared. “We wanted it to look solid, textured but still moveable and shiny. The gorgeous grit comes from the front, and the pretty is all about the long hair with bend. It’s pretty, powerful and perfectly undone.”

The show took place off site at Foy Lane, Surry Hills, with an outdoor runway on a sunny Sydney day. The Anna Quan look evoked luxury, taking inspiration from Japanese city life and the artist Pawel Jaszczuk’s concept of the Japanese Salaryman, which centres on a story of the white-collar worker. It also paid homage to the fashion house’s ten-year history as a full circle moment for Anna Quan.


The Wella team complemented this sense of quiet cool with tousled, textured hair made to look handsome. Female models had clips and extensions courtesy of Jadore Hair Extensions for added volume, thickness and impact to short and long hair styles for strong, structured looks. The male styles leant into each model’s individual aesthetic and were unified by plenty of shine.

The suite of Wella products were layered to achieve the look, and hero products included the brand’s EIMI Dry Me, Glam Mist, Mistify Me, Ocean Spritz, Perfect Setting, Rugged Texture and Sculpt Force, for an overall textured, fierce and wearable look. Get the look below:
- STEP ONE: Prep hair with Wella EIMI Dry Me to give it volume and body.
- STEP TWO: Working in sections, prep the root with Wella EIMI Ocean Spritz and Perfect Setting, then blow dry in over directing angle to angle.
- STEP THREE: Prep the front section with Wella EIMI Mistify Me Light and clip up to create root lift and give shape at the front.
- STEP FOUR: Before adding extensions, prep the section with Wella EIMI Mistify Me Light and blow dry hair wefts overdirecting at roots.
- STEP FIVE: Once extensions are in, carefully blend the hair with extensions by adding a slight bend and generously spritz with Wella EIMI Glam Mist for Shine.
- STEP SIX: Take clips out of the front section to reveal the height created. Then prep the front with Wella EIMI Perfect Setting and blow dry, directing hair up and back. Set with Wella EIMI Mistify Me Strong.
- STEP SEVEN: Go over the front section with a hot tong and clip up to hold shape.
- STEP EIGHT: Slick sides back with Wella EIMI Mistify Me Strong, Sculpt Force and a bristle brush.
- STEP NINE: Unclip the front section and brush out slightly brushing back from underneath to keep the height. Then go over the ends with a straightener.
- STEP TEN: Perfect the hair using fingers and Wella EIMI Rugged Texture.
For more information visit www.wella.com
Images by Vienna Marie